Lightup your Netgate SG-3100 Router LEDs⚡
A step-by-step guide to turning the front RGB LEDs of your Netgate SG-3100 into a live network dashboard — no SSH required.
✨ Intro — why I did this
I recently bought a Netgate SG-3100 running pfSense® Plus on its ARM CPU and immediately thought: “Those three LEDs aren’t telling me anything useful!”
With one lightweight shell script and three GUI clicks we can make
- Square LED → Internet health (8.8.8.8)
- Circle LED → LAN host 192.168.1.3 (My Unifi AP)
- Diamond LED → LAN host 192.168.1.5 (My HomeLab server / NAS)
refresh every few seconds and keep working after every reboot.
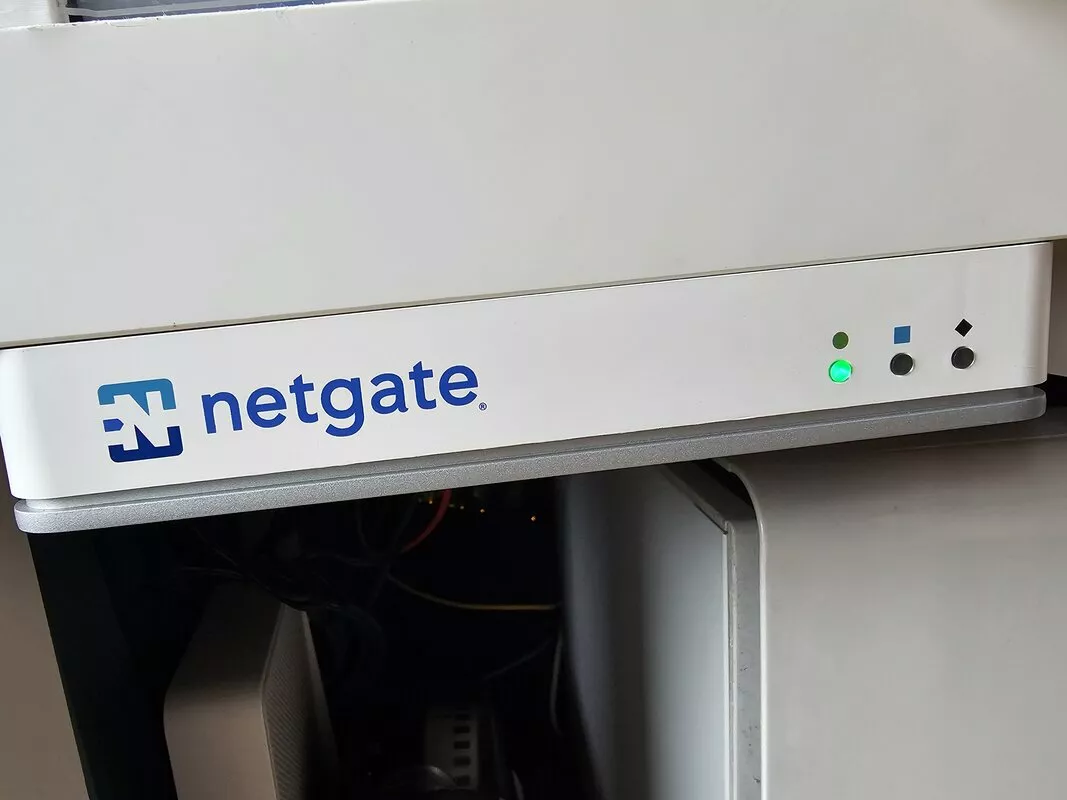
🎯 Results in Action
✅ Healthy Network State
WAN LED: Green (Internet OK) • Host LEDs: Off (Both reachable)
❌ WAN Down State
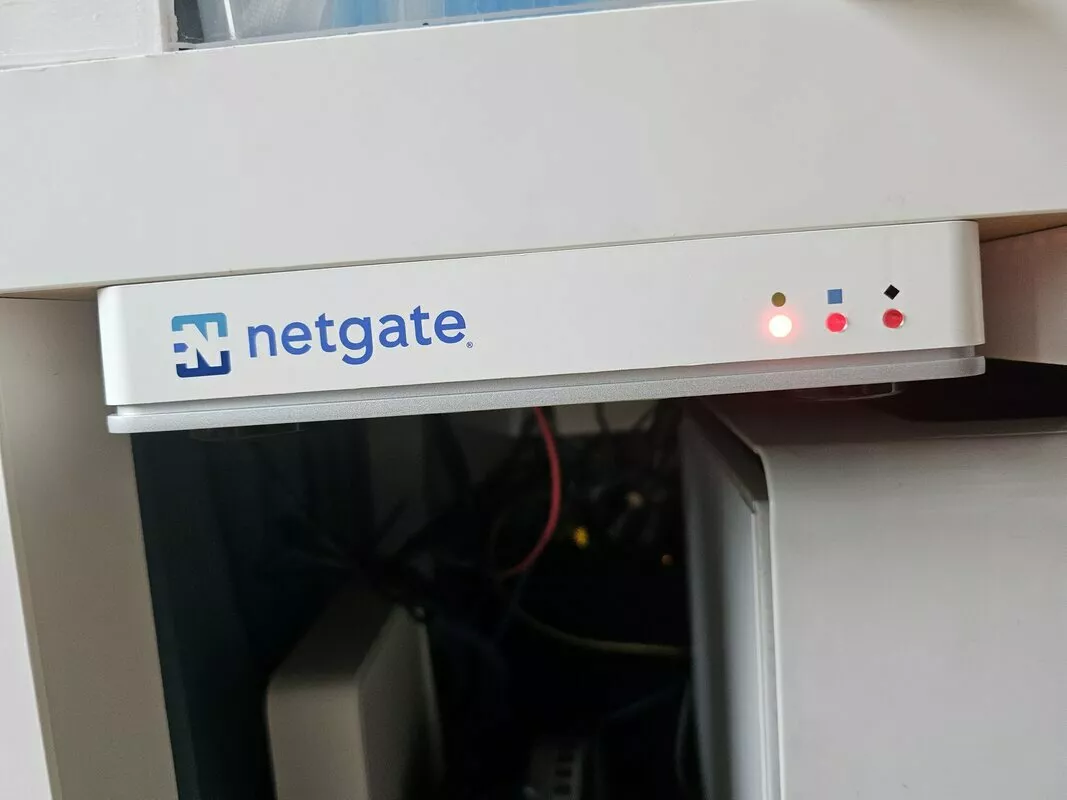
WAN LED: Red (No Internet) • Host LEDs: Off (Both reachable)
LED Logic Summary:
- Green WAN = Internet connectivity healthy
- Red WAN = Internet down or services failed
- Violet WAN = DHCP or DNS services stopped
- Off Host LEDs = Local devices responding
- Orange Host LEDs = Local devices unreachable
🛠️ Implementation Details
1 Why a custom script?
- The SG-3100’s IS31FL3193 controller boots in “breathing” mode; we must switch it to PWM before manual colours stick.
- pfSense exposes those PWM registers via
sysctl dev.gpio.*.led.*.pwmandgpioctl, so no kernel hacking is needed. - The Shellcmd package lets any script run automatically late in the boot process, surviving firmware upgrades.
Thanks to Zachary Schneider for decoding these registers and sharing them!
2 Packages you need
| Package | Why it matters | Where to install |
|---|---|---|
Shellcmd (pfSense-pkg-Shellcmd) |
Stores a shellcmd line in config.xml so pfSense runs your script after packages load. | System ▸ Package Manager ▸ Available Packages → search shellcmd → Install → Confirm |
No other packages are required; everything else uses built-in utilities.
3 Create the script (Diagnostics ▸ Edit File)
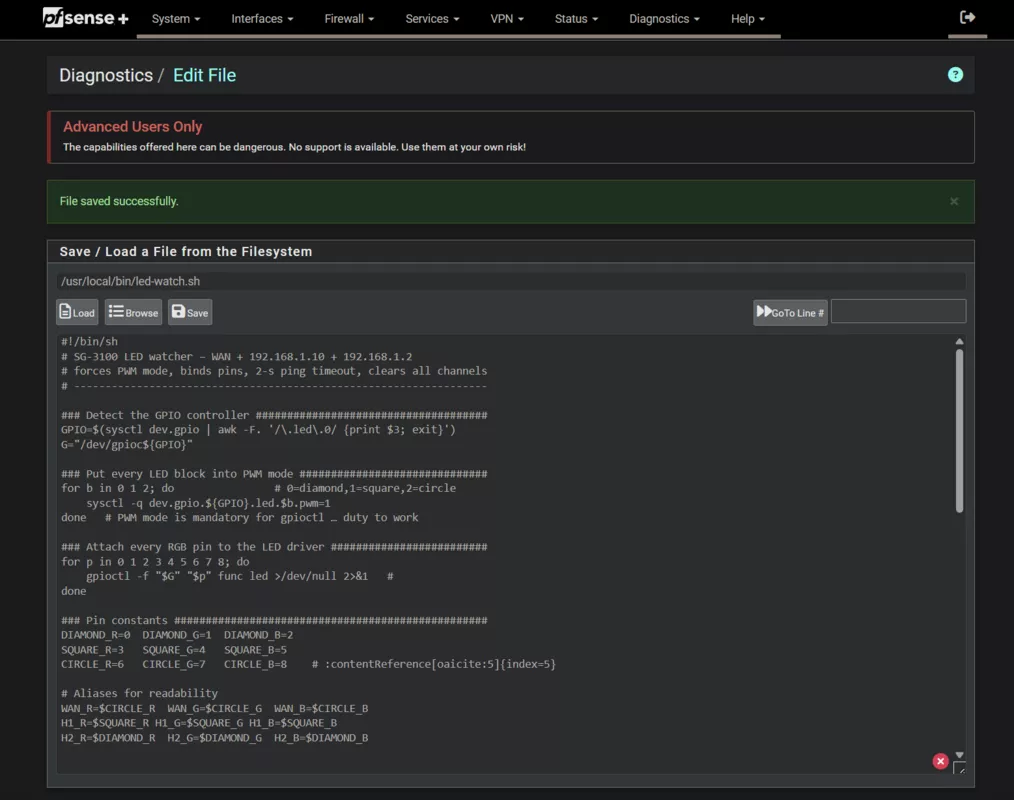
- Diagnostics ▸ Edit File
-
Path to file →
1
/usr/local/bin/led-watch.sh
Click Load (blank editor).
- Paste everything below and adjust the HOST1, and HOST2 variables to match your network. Host1 and Host2 are the IPs of the 2 hosts you want to monitor, e.g. your Unifi AP and HomeLab server. Hit Save.
1
2
3
4
5
6
7
8
9
10
11
12
13
14
15
16
17
18
19
20
21
22
23
24
25
26
27
28
29
30
31
32
33
34
35
36
37
38
39
40
41
42
43
44
45
46
47
48
49
50
51
52
53
54
55
56
57
58
59
60
61
62
63
64
65
66
67
68
69
70
71
72
73
74
75
76
77
78
79
80
81
82
83
84
85
86
87
88
89
90
91
92
93
94
95
96
97
98
99
100
101
102
103
104
105
106
107
108
109
110
111
112
113
114
115
116
117
118
119
120
121
122
#!/bin/sh
# SG-3100 LED watcher – WAN + 192.168.1.10 + 192.168.1.2
# forces PWM mode, binds pins, 2-s ping timeout, clears all channels
# ------------------------------------------------------------------

### Detect the GPIO controller #####################################
GPIO=$(sysctl dev.gpio | awk -F. '/\.led\.0/ {print $3; exit}')
G="/dev/gpioc${GPIO}"

### Put every LED block into PWM mode ##############################
for b in 0 1 2; do                # 0=diamond,1=square,2=circle
    sysctl -q dev.gpio.${GPIO}.led.$b.pwm=1
done   # PWM mode is mandatory for gpioctl … duty to work

### Attach every RGB pin to the LED driver #########################
for p in 0 1 2 3 4 5 6 7 8; do
    gpioctl -f "$G" "$p" func led >/dev/null 2>&1
done

### Pin constants ##################################################
DIAMOND_R=0   DIAMOND_G=1  DIAMOND_B=2
SQUARE_R=3    SQUARE_G=4   SQUARE_B=5
CIRCLE_R=6    CIRCLE_G=7   CIRCLE_B=8

# Aliases for readability
WAN_R=$CIRCLE_R   WAN_G=$CIRCLE_G   WAN_B=$CIRCLE_B
H1_R=$SQUARE_R    H1_G=$SQUARE_G    H1_B=$SQUARE_B
H2_R=$DIAMOND_R   H2_G=$DIAMOND_G   H2_B=$DIAMOND_B

### Helper ##########################################################
set_led() { gpioctl -f "$G" "$1" duty "$2"; }   # 0–255 PWM

### Ping settings ##################################################
PING_T=2                # seconds; −W uses seconds on FreeBSD
WAN_TGT=8.8.8.8
HOST1=192.168.1.3
HOST2=192.168.1.5

### Main loop #######################################################
while :; do

  #######
  # WAN #
  #######

  # 1) Check for Kea‐DHCP (IPv4) process and Unbound process.
  #    If either is NOT running, force the WAN LED to violet.
  #
  #    On pfSense, the Kea daemon for IPv4 is called "kea-dhcp4" :contentReference[oaicite:0]{index=0},
  #    and the DNS Resolver runs as "unbound". If pgrep finds no matching PID,
  #    we assume that service is down.
  if ! pgrep -x kea-dhcp4 >/dev/null 2>&1 || ! pgrep -x unbound >/dev/null 2>&1; then
    # Violet = Red + Blue at moderate PWM (12/12)
    set_led $WAN_R 12
    set_led $WAN_G 0
    set_led $WAN_B 12

  else
    # 2) Both services are running → fall back to the original ping-based logic:

    # Try one quick ping to WAN_TGT
    if /sbin/ping -q -c1 -W "$PING_T" "$WAN_TGT" >/dev/null 2>&1; then
      # WAN is reachable → green
      set_led $WAN_R 0
      set_led $WAN_G 2
      set_led $WAN_B 0

    else
      # Wait 2s and try again
      sleep 2
      if /sbin/ping -q -c1 -W "$PING_T" "$WAN_TGT" >/dev/null 2>&1; then
        # Temporary glitch, now reachable → green
        set_led $WAN_R 0
        set_led $WAN_G 3
        set_led $WAN_B 0
      else
        # Still unreachable → red
        set_led $WAN_R 255
        set_led $WAN_G 0
        set_led $WAN_B 0
      fi
    fi
  fi

  sleep 1

  ##########
  # Host 1 #
  ##########
  if /sbin/ping -q -c1 -W "$PING_T" "$HOST1" >/dev/null 2>&1; then
      # reachable → off
      set_led $H1_R 0
      set_led $H1_G 0
      set_led $H1_B 0
  else
      # down → dim orange
      set_led $H1_R 100
      set_led $H1_G 10
      set_led $H1_B 0
  fi

  sleep 1

  ##########
  # Host 2 #
  ##########
  if /sbin/ping -q -c1 -W "$PING_T" "$HOST2" >/dev/null 2>&1; then
      # reachable → off
      set_led $H2_R 0
      set_led $H2_G 0
      set_led $H2_B 0
  else
      # down → dim orange
      set_led $H2_R 100
      set_led $H2_G 10
      set_led $H2_B 0
  fi

  sleep 18

done
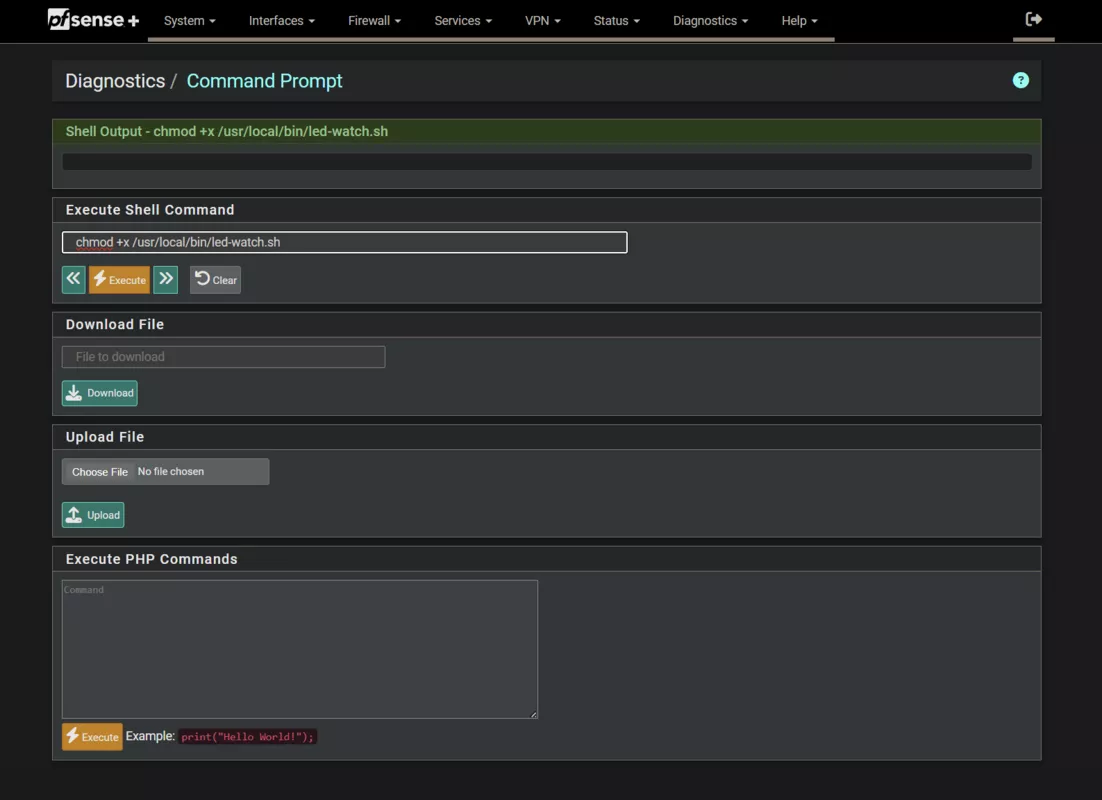
4 Make it executable (Diagnostics ▸ Command Prompt)
Open Diagnostics ▸ Command Prompt and run:
1
chmod +x /usr/local/bin/led-watch.sh
5 Test the script (Diagnostics ▸ Command Prompt)
Run the script in the background:
1
/usr/local/bin/led-watch.sh &
You should see the LEDs change colours every 20 seconds. If you see no change, check the Troubleshooting table at the end of this post.
Don’t forget to stop the script befor if you want to retrie it since it will run in the background and keep updating the LEDs every 20 seconds.
If you want to stop the script, run:
1
pkill -f led-watch.sh
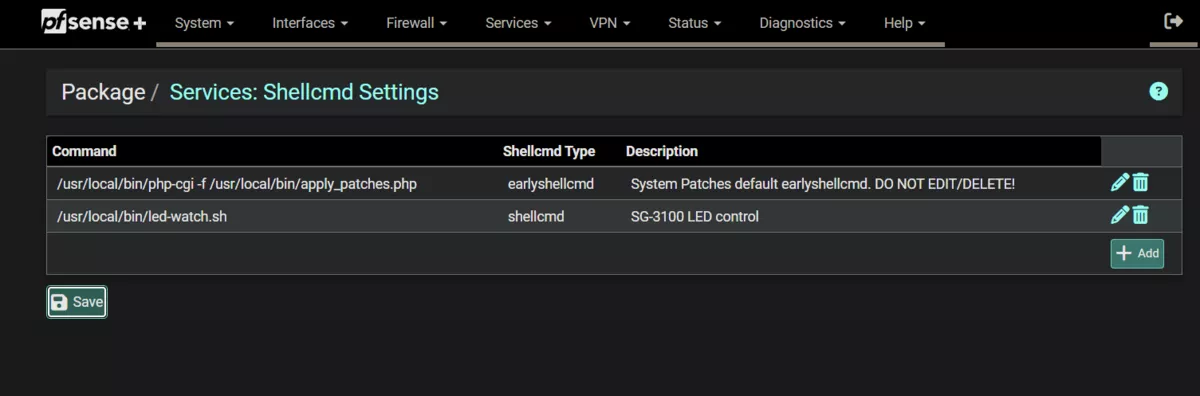
6 Autostart with pfSense (Services ▸ Shellcmd)
- Services ▸ Shellcmd
- Add a new row:
| Field | Value |
|---|---|
| Command | /usr/local/bin/led-watch.sh & |
| Type | shellcmd |
| When | After packages |
- Save → Apply Changes — pfSense now runs the script at every boot.
7 Reboot & verify
Reboot via Diagnostics ▸ Reboot.
Within ~10 s the LEDs settle into their new colours and update every 20 s.
If a block stays dark:
1
2
sysctl dev.gpio.${GPIO}.led.{0,1,2}.pwm     # all must be 1
gpioctl -f "$G" -l | grep '^[0-8]'          # every pin mode = led
8 Need darkness?
1
2
pkill -f led-watch.sh
for p in 0 1 2 3 4 5 6 7 8; do gpioctl -f "$G" "$p" duty 0; done
9 Troubleshooting table
| Symptom | Likely cause | Fix |
|---|---|---|
| Colours never change | Pin not in LED function | gpioctl -f "$G" <pin> func led |
| Script doesn’t run after reboot | Wrong “When” value | Use After packages |
| LEDs flash random colours on upgrade | PWM flag reset | Re-run sysctl … pwm=1 |
🔗 References & thanks
- Zachary Schneider — “Customizing the LEDs on the Netgate SG-3100” — pin-map & PWM pioneer. Zach’s post
- Netgate docs and forum threads on GPIO / Shellcmd.
Thanks again, Zach, for blazing the trail and saving the rest of us hours of trial-and-error!