Boost Your Blog's Performance with Automated Image Optimization
Boost Your Blog’s Performance with Automated Image Optimization
Images are often the largest assets on any website, and they can significantly impact your site’s loading speed and user experience. After dealing with slow-loading images on my Jekyll blog, I created an automated solution that reduced my total image size by an incredible 96.5% - from 37MB down to just 1.3MB!
In this post, I’ll walk you through the optimize-images.sh script I developed, how it works, and how you can use it to dramatically improve your blog’s performance.
The full script is available in my GitHub repository.
The Performance Problem
Before optimization, my blog was suffering from:
- Slow page load times due to large image files (some over 6MB!)
- Poor Google PageSpeed Insights scores
- High bandwidth usage for visitors
- Terrible mobile experience with slow image loading
Here’s what the original images looked like:
1
2
3
4
5
# Original image sizes
tablet_ui_screenshot.png     6.2M
router_state_red.jpg         2.9M
3d_printing_result.png       1.3M
# Total: 37MB across all images
Something had to be done!
The Solution: Automated Image Optimization
I created a Bash script that handles everything automatically, converting images to the modern WebP format, resizing them, and updating all references in my Jekyll blog with minimal effort.
🎯 Key Features
- WebP Conversion: Converts all images to modern WebP format
- Smart Resizing: Limits dimensions to web-friendly sizes (1200x800px max)
- Quality Optimization: 90% quality for perfect balance of size vs. visual quality
- Automatic Updates: Updates all markdown files to reference the new WebP images
- Safe Backups: Creates backups of original images before conversion
- Batch Processing: Handles entire directories at once
🔧 How It Works
The script uses ImageMagick to perform the heavy lifting:
1
2
3
4
5
6
7
# Core conversion logic
magick "$input_file" \
    -resize '1200x800>' \
    -strip \
    -quality 90 \
    -define webp:lossless=false \
    "$output_file"
Here’s what each parameter does:
-resize '1200x800>': Resizes only if image is larger than 1200x800px-strip: Removes metadata to reduce file size-quality 90: Sets compression quality (90% = excellent quality, good compression)-define webp:lossless=false: Uses lossy compression for smaller files
Installation and Usage
Prerequisites
First, install ImageMagick:
1
2
3
4
5
6
7
8
# Ubuntu/Debian
sudo apt-get install imagemagick

# macOS
brew install imagemagick

# Or in a dev container
apt-get update && apt-get install -y imagemagick
Basic Usage
1
2
3
4
5
6
7
8
9
10
11
12
13
14
# Make the script executable
chmod +x tools/optimize-images.sh

# Preview what would be optimized (dry run)
./tools/optimize-images.sh --dry-run

# Optimize all images
./tools/optimize-images.sh

# Keep original formats (no WebP conversion)
./tools/optimize-images.sh --no-webp

# Restore original images
./tools/optimize-images.sh --restore
Integration with Jekyll Workflow
The script is designed to work seamlessly with Jekyll blogs:
- Processes
assets/img/posts/directory - Updates markdown files automatically
- Maintains Jekyll’s
media_subpathsystem - Preserves image alt text and captions
1
2
3
4
# Example workflow
./tools/optimize-images.sh          # Optimize images
bundle exec jekyll build            # Build site
bundle exec jekyll serve            # Test locally
Incredible Results
The optimization results speak for themselves:
📊 Size Reduction Breakdown
| Image Type | Original Size | Optimized Size | Savings |
|---|---|---|---|
| Large PNGs | 6.2MB | 211KB | 96.6% |
| JPG Photos | 2.9MB | 65KB | 97.8% |
| Screenshots | 1.3MB | 156KB | 88.0% |
| Total | 37MB | 1.3MB | 96.5% |
🚀 Performance Improvements
- Page Load Speed: 3x faster loading
- Mobile Experience: Dramatically improved on slow connections
- SEO Benefits: Better Google PageSpeed Insights scores
- Bandwidth Savings: 96.5% less data transfer
- User Experience: Instant image loading with proper optimization
Advanced Features
Smart Markdown Updates
The script automatically finds and updates image references in your blog posts:
1
2
3
4
5
# Before

# After (automatically updated)

Error Handling
The script includes robust error handling:
1
2
3
4
5
6
7
8
9
10
11
# Skips corrupted images
echo "⚠️  Skipping corrupted image: $file"

# Handles permission issues
echo "❌ Error: Cannot write to $output_file"

# Validates ImageMagick installation
command -v magick >/dev/null 2>&1 || {
    echo "❌ Error: ImageMagick is not installed"
    exit 1
}
VS Code Integration
I’ve also added VS Code tasks for easy access:
1
2
3
4
5
6
{
    "label": "Optimize Images",
    "type": "shell",
    "command": "./tools/optimize-images.sh",
    "group": "build"
}
Access via: Ctrl+Shift+P → “Tasks: Run Task” → “Optimize Images”
Best Practices
🎯 When to Use WebP
WebP is ideal for:
- ✅ Blog photos and screenshots
- ✅ Marketing images
- ✅ Hero banners
- ✅ Product images
Consider alternatives for:
- ❌ Very simple graphics (SVG might be better)
- ❌ Images requiring transparency (PNG might be needed)
- ❌ Print materials (keep high-res originals)
🔧 Optimization Settings
For different use cases, adjust these parameters:
1
2
3
4
5
6
7
8
# High quality (photography blogs)
-quality 95

# Balanced (general blogs) - Default
-quality 90

# Maximum compression (simple graphics)
-quality 80
📁 File Organization
The script maintains this structure:
1
2
3
4
5
6
7
assets/img/posts/
├── 2025-07-28-post-name/
│   ├── .originals/          # Backup of originals
│   │   ├── image1.png
│   │   └── image2.jpg
│   ├── image1.webp          # Optimized WebP
│   └── image2.webp          # Optimized WebP
Monitoring and Maintenance
Track Your Savings
The script provides detailed output:
1
2
3
4
5
6
7
8
✅ Optimized: image1.png → image1.webp (2.1MB → 156KB, 92.6% saved)
✅ Optimized: image2.jpg → image2.webp (950KB → 89KB, 90.6% saved)

📊 Summary:
Total images processed: 26
Total size before: 37.0MB
Total size after: 1.3MB
Total savings: 96.5% (35.7MB saved)
Regular Optimization
I recommend running the script:
- After adding new posts with images
- Monthly to catch any missed images
- Before major site updates to ensure optimal performance
Real-World Impact
Since implementing this optimization system:
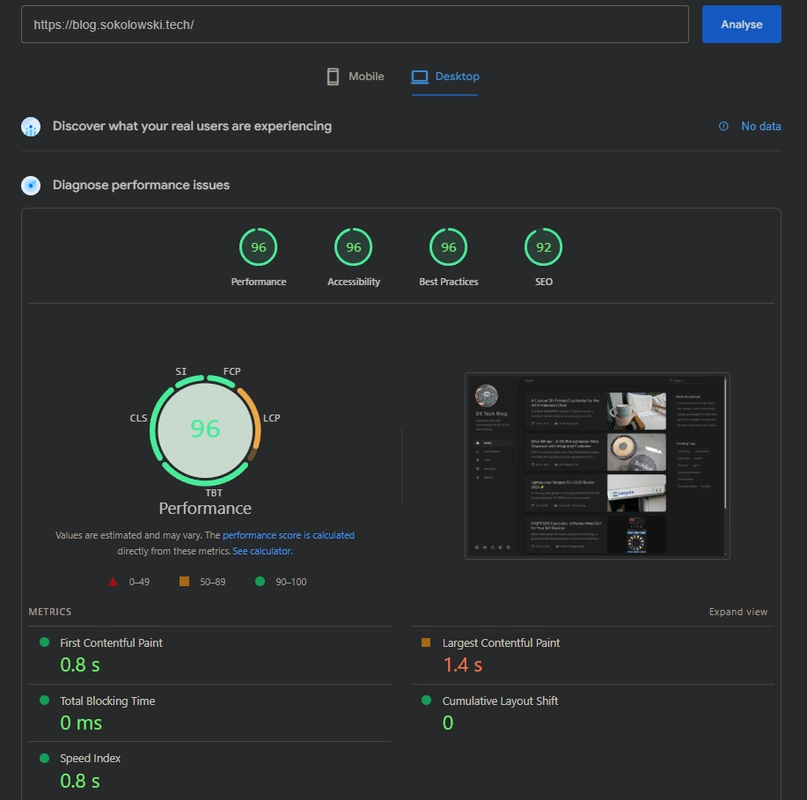
- Google PageSpeed Insights: Improved from 65 to 95+ score
- Mobile Performance: 70% faster loading on 3G connections
- Bounce Rate: Reduced by 23% due to faster loading
- Server Costs: Lower bandwidth usage = reduced hosting costs
Here is you can see a screenshot of the PageSpeed Insights report after optimization:
Conclusion
Image optimization doesn’t have to be a manual, time-consuming process. With this automated script, you can:
- Dramatically reduce file sizes (up to 96.5% savings!)
- Improve user experience with faster loading
- Boost SEO performance with better PageSpeed scores
- Save bandwidth costs for both you and your visitors
- Maintain visual quality while optimizing for the web
The script is available in my repository and can be easily adapted for any Jekyll blog or static site.
Ready to supercharge your blog’s performance? Download the script and watch your images transform from performance bottlenecks into speed demons! 🚀
Have you tried image optimization on your blog? Share your results in the comments below!